In our previous post, we introduced AppLink as a powerful new way to extend Salesforce with any programming language at any scale, detailing its core components and overarching benefits. Now, we’ll dive deeper into the practical application of AppLink by exploring its primary integration patterns. Understanding these patterns is key to leveraging AppLink effectively, as they dictate how your Heroku applications interact with and enhance your Salesforce orgs.
Usage patterns
AppLink supports four proven integration patterns, but we’ll focus on the two primary patterns that represent the main integration approaches – the other two patterns are variations of these same foundational concepts. Note that these patterns align with AppLink’s three official user modes: Pattern 1 corresponds to “run-as-user mode”, while Pattern 2 uses both “user mode” and “user mode plus” (for elevated permissions). Let’s explore both core patterns with their specific architectures and implementation approaches.
Pattern 1: Salesforce API access
This pattern uses run-as-user mode authentication, which enables system-level operations with consistent, predictable permissions by using a specific designated user’s context. This approach is ideal for automated processes and customer-facing applications that require stable permission sets and don’t depend on the triggering user’s access level. Run-as-user authorizations allow your Heroku applications to access Salesforce data across multiple orgs with the permissions of the designated user.
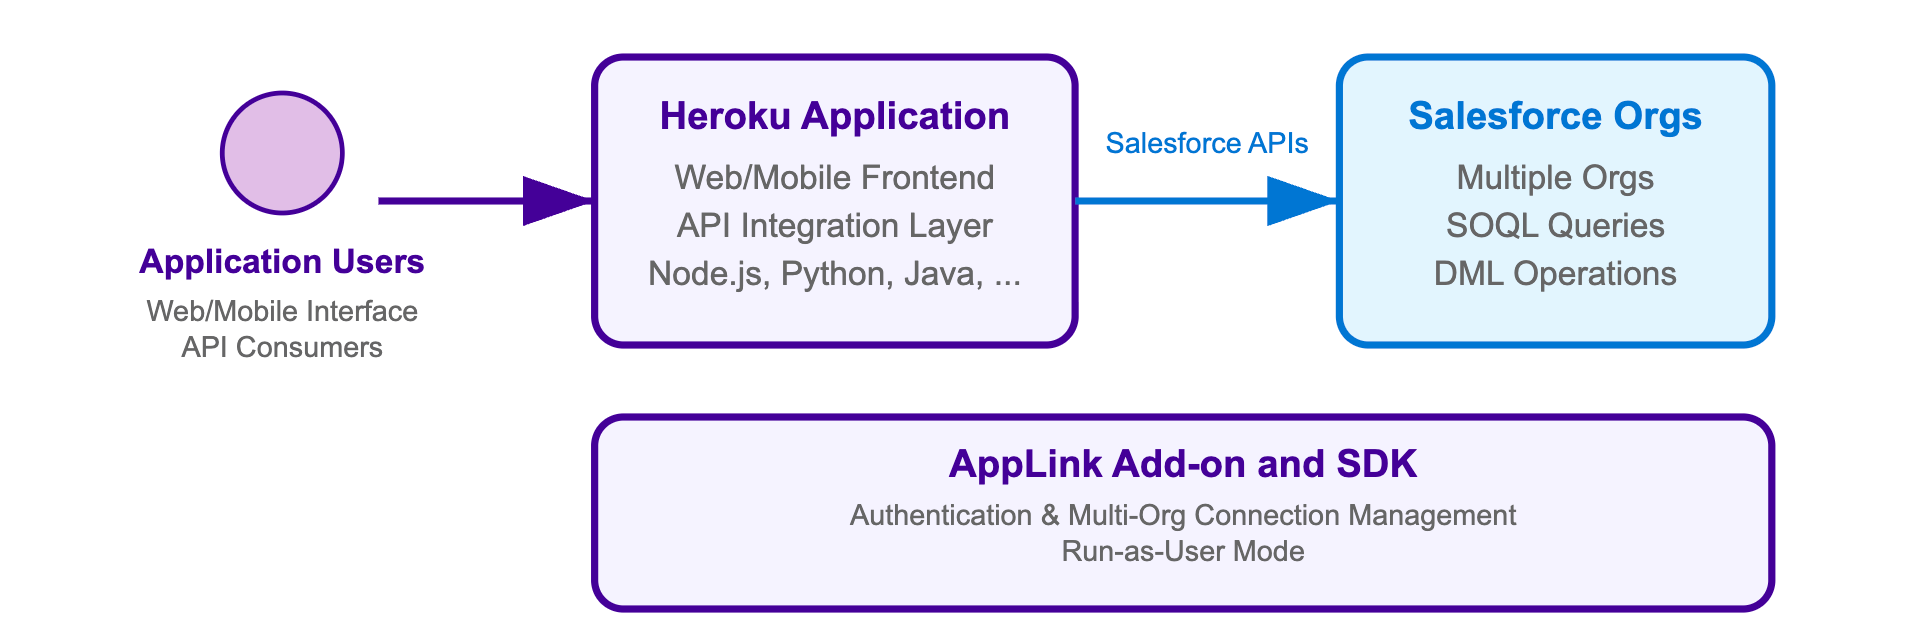
For a Heroku application that accesses Salesforce APIs, you need:
- AppLink Add-on:
heroku addons:create heroku-applink - AppLink CLI Plugin: Install the Heroku CLI plugin for deployment commands
- Org Login: An org login for a user with the ‘Manage Heroku Apps’ permission
- AppLink SDK (optional): For your chosen language to simplify integration
Here’s the complete command sequence for deploying and connecting a Node.js application with Salesforce API access, adapted from our Pattern 1 sample:
# Create and configure Heroku app
heroku create
heroku addons:create heroku-applink --wait
heroku buildpacks:add heroku/nodejs
heroku config:set HEROKU_APP_ID="$(heroku apps:info --json | jq -r '.app.id')"

# Connect to Salesforce org(s) using run-as-user mode
heroku salesforce:authorizations:add my-org
heroku config:set CONNECTION_NAMES=my-org

# Deploy application
git push heroku main
heroku open
Your application retrieves named authorizations and performs SOQL queries across multiple Salesforce orgs. The SDK simplifies multi-org connectivity through the AppLink add-on, which manages authentication and connection pooling automatically.
The first step in your Node.js application is initializing the AppLink SDK and retrieving a specific named authorization. This follows familiar Node.js patterns where connection details are managed through environment variables:
// From heroku-applink-pattern-api-access-nodejs/index.js
const sdk = init();

// Get connection names from environment variable
const connectionNames = process.env.CONNECTION_NAMES ?
  process.env.CONNECTION_NAMES.split(',') : []

// Initialize connection for specific org
const org = await sdk.addons.applink.getAuthorization(connectionName.trim())
console.log('Connected to Salesforce org:', {
  orgId: org.id,
  username: org.user.username
})
Once you have an org connection, executing SOQL queries becomes straightforward using the Data API. The SDK handles authentication, session management, and provides structured responses that are easy to work with:
// Execute SOQL query using the Data API
const queryResult = await org.dataApi.query('SELECT Name, Id FROM Account')
console.log('Query results:', {
  totalSize: queryResult.totalSize,
  done: queryResult.done,
  recordCount: queryResult.records.length
})

// Transform the records to expected format
const accounts = queryResult.records.map(record => ({
  Name: record.fields.Name,
  Id: record.fields.Id
}))
For Java developers, refer to the SalesforceClient.java class in the Java Pattern 1 sample for equivalent functionality. This implementation directly uses the AppLink API endpoint GET /authorizations/{connection_name} as described in the AppLink API documentation, demonstrating how to integrate without the SDK by making HTTP calls to ${HEROKU_APPLINK_API_URL}/authorizations/{developerName} with Bearer token authentication.
When you run the sample application locally or deploy it to Heroku, the code above produces a web interface that displays Account records from your connected Salesforce orgs. The application demonstrates both single-org and multi-org connectivity, with automatic authentication handling through the AppLink add-on:

The interface shows Account records from each connected org, along with connection details and bulk API capabilities. This demonstrates how AppLink simplifies multi-org data access patterns that would otherwise require complex OAuth flows and session management.
Pattern 2: Extending Salesforce
This pattern enables Salesforce users to invoke your Heroku applications directly from within Salesforce through Flow, Apex, or AgentForce. Your application becomes a published service that extends Salesforce capabilities across Lightning Experience, Sales Cloud, Service Cloud, and other Salesforce products. By publishing your application through AppLink, you’re extending the Salesforce platform with custom business logic that users can seamlessly access from their familiar Salesforce interface.
This pattern uses User Mode authentication, which provides the most secure integration by inheriting the exact permissions of the Salesforce user who triggers the operation. Additionally, User Mode supports elevated permissions (known as “user mode plus” in the main documentation) that are granted exclusively during code execution through Permission Sets. This allows your Heroku application to perform operations that the triggering user cannot normally perform, with admin-approved elevated permissions visible through Permission Sets in the org.
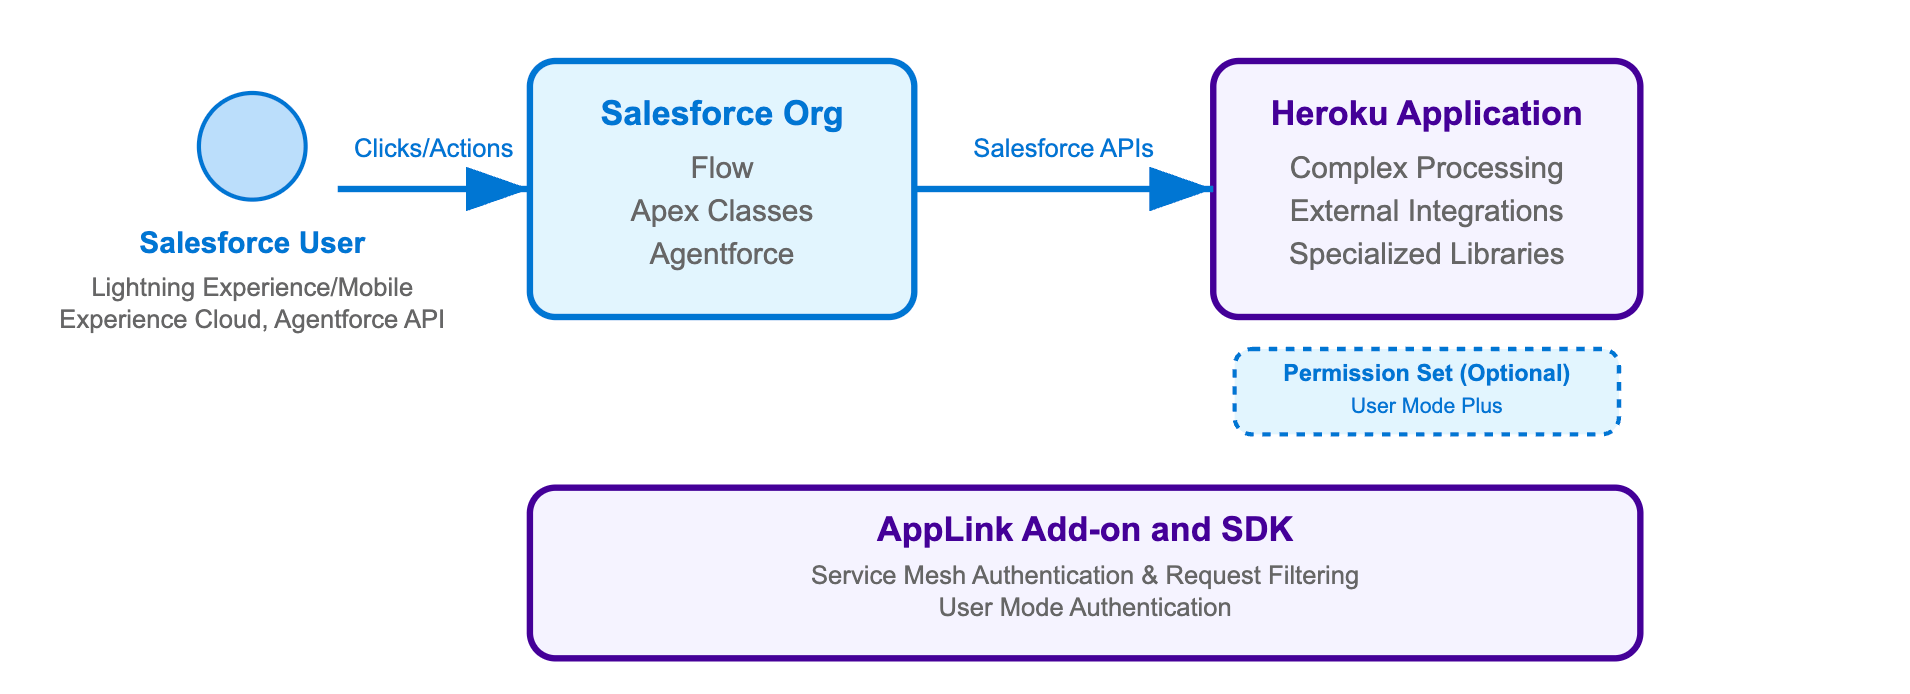
For a Heroku application designed to be invoked by Salesforce, you need:
- AppLink Add-on:
heroku addons:create heroku-applink - AppLink Buildpack:
heroku buildpacks:add --index=1 heroku/heroku-applink-service-mesh - AppLink CLI Plugin: Install the Heroku CLI plugin for deployment commands
- OpenAPI YAML file: Describing your HTTP endpoints for Salesforce discovery
- Org Login: An org login for a user with the ‘Manage Heroku Apps’ permission
- AppLink SDK (optional): For your chosen language to simplify integration
- Procfile Configuration: To inject the service mesh for authentication
The deployment process requires an api-docs.yaml file that describes your HTTP endpoints using the OpenAPI specification format. This file serves as the bridge between your Heroku application and Salesforce, enabling automatic generation of Apex classes, Flow actions, and Agentforce integrations. The YAML file contains both standard API documentation and Salesforce-specific metadata that controls authentication and permissions – we’ll explore its structure and contents in detail later in this blog.
The following command sequence installs the AppLink add-on, configures a buildpack that injects a request interceptor known as the service mesh (which handles authentication and blocks external access), and establishes the secure connection between your Heroku application and Salesforce org. Note that Pattern 2 uses salesforce:connect to create connections (for app publishing) rather than salesforce:authorizations:add used in Pattern 1 (for data access). This deployment and connection process is adapted from our Pattern 2 sample:
# Create and configure Heroku app
heroku create
heroku addons:create heroku-applink
heroku buildpacks:add --index=1 heroku/heroku-applink-service-mesh
heroku buildpacks:add heroku/nodejs
heroku config:set HEROKU_APP_ID="$(heroku apps:info --json | jq -r '.app.id')"

# Deploy and connect to Salesforce
git push heroku main
heroku salesforce:connect my-org
heroku salesforce:publish api-docs.yaml --client-name GenerateQuote --connection-name my-org --authorization-connected-app-name GenerateQuoteConnectedApp --authorization-permission-set-name GenerateQuotePermissions
Your Procfile needs to route requests through the service mesh for authentication, and your application should use APP_PORT instead of the standard PORT environment variable (which is now used by the service mesh). For example, in Node.js:
// From config/index.js
port: process.env.APP_PORT || 8080,
web: APP_PORT=3000 heroku-applink-service-mesh npm start
Important security note: The service mesh will by default block all incoming requests to the application unless they are from a Salesforce org. The HEROKU_APP_ID config variable is currently required as part of the implementation – in future releases we will look to remove this requirement.
Once your application is deployed and published, you need to grant the appropriate permissions to users who will be invoking your Heroku application through Apex, Flow, or Agentforce:
# Grant permissions to users
sf org assign permset --name GenerateQuote -o my-org
sf org assign permset --name GenerateQuotePermissions -o my-org
The permission sets serve different purposes: GenerateQuote grants users access to the Heroku app (through the Flow, Apex or Agentforce interaction they are using), while GenerateQuotePermissions provides additional permissions the code might require to access objects and fields in the org that the user cannot normally access – this elevated permission model is discussed in the next section in more detail.
Applications use familiar Express-style middleware to parse incoming Salesforce requests and enable transactional operations. The SDK’s parseRequest method handles the complex process of extracting user context and authentication details from Salesforce requests – no need to manually parse headers or manage authentication tokens.
When using the AppLink SDK with your preferred Node.js web framework, middleware configuration follows standard patterns. The Pattern 2 sample uses Fastify (though Express.js, Koa, or other frameworks work equally well), where the SDK automatically parses incoming request headers and body, extracting user context and setting up the authenticated Salesforce client for your route handlers.
The middleware is implemented as a Fastify plugin that applies to all routes:
// From heroku-applink-pattern-org-action-nodejs/src/server/middleware/salesforce.js
const preHandler = async (request, reply) => {
  const sdk = salesforceSdk.init();
  try {
    // Parse incoming Salesforce request headers and body
    const parsedRequest = sdk.salesforce.parseRequest(
      request.headers,
      request.body,
      request.log
    );

    // Attach Salesforce client to request context
    request.salesforce = Object.assign(sdk, parsedRequest);
  } catch (error) {
    console.error('Failed to parse request:', error.message);
    throw new Error('Failed to initialize Salesforce client');
  }
};
This middleware plugin is registered in the main application file where the Fastify server is configured:
// From heroku-applink-pattern-org-action-nodejs/src/server/app.js
import { salesforcePlugin } from './middleware/salesforce.js';

// Register Salesforce plugin
await fastify.register(salesforcePlugin);
For developers not using the AppLink SDK, the key integration point is parsing the x-client-context header that contains base64-encoded JSON with authentication and user context. Here’s how you can implement this manually in Java:
// From heroku-applink-pattern-org-action-java/.../SalesforceClientContextFilter.java
private static final String X_CLIENT_CONTEXT_HEADER = "x-client-context";

// Decode the base64 header value and parse the JSON
String encodedClientContext = request.getHeader(X_CLIENT_CONTEXT_HEADER);
String decodedClientContext = new String(
  Base64.getDecoder().decode(encodedClientContext),
  StandardCharsets.UTF_8
);

ObjectMapper objectMapper = new ObjectMapper();
JsonNode clientContextNode = objectMapper.readTree(decodedClientContext);

// Extract authentication and context fields
String accessToken = clientContextNode.get("accessToken").asText();
String apiVersion = clientContextNode.get("apiVersion").asText();
String orgId = clientContextNode.get("orgId").asText();
String orgDomainUrl = clientContextNode.get("orgDomainUrl").asText();

JsonNode userContextNode = clientContextNode.get("userContext");
String userId = userContextNode.get("userId").asText();
String username = userContextNode.get("username").asText();
This approach bypasses the SDK entirely and directly constructs the Salesforce SOAP API endpoint ({orgDomainUrl}/services/Soap/u/{apiVersion}) using the authentication details from the header. The JSON structure in the x-client-context header contains:
{
  "accessToken": "00D...",
  "apiVersion": "62.0",
  "requestId": "request-123",
  "orgId": "00Dam0000000000",
  "orgDomainUrl": "https://yourorg.my.salesforce.com",
  "userContext": {
    "userId": "005am000001234",
    "username": "user@example.com"
  }
}
One of the key advantages of Pattern 2 applications is the ability to perform multiple DML operations atomically – similar to database transactions in Node.js ORMs like Sequelize or Prisma. The SDK’s Unit of Work pattern ensures all operations succeed or fail together, providing transactional integrity for complex business processes that involve creating or updating multiple related records:
// From heroku-applink-pattern-org-action-nodejs/src/server/services/pricingEngine.js
const { context } = client;
const org = context.org;

// Create Unit of Work for transactional operations
const unitOfWork = org.dataApi.newUnitOfWork();

// Register Quote creation
const quoteRef = unitOfWork.registerCreate({
  type: 'Quote',
  fields: {
    Name: 'New Quote',
    OpportunityId: request.opportunityId
  }
});

// Register related QuoteLineItems
queryResult.records.forEach(record => {
  const discountedPrice = (quantity * unitPrice) * (1 - effectiveDiscountRate);

  unitOfWork.registerCreate({
    type: 'QuoteLineItem',
    fields: {
      QuoteId: quoteRef.toApiString(), // Reference to Quote being created
      PricebookEntryId: record.fields.PricebookEntryId,
      Quantity: quantity,
      UnitPrice: discountedPrice / quantity
    }
  });
});

// Commit all operations in one transaction
const results = await org.dataApi.commitUnitOfWork(unitOfWork);
const quoteResult = results.get(quoteRef);
return { quoteId: quoteResult.id };
For comprehensive examples including Bulk API operations, event handling, and advanced patterns, explore the complete integration patterns samples which demonstrate real-world scenarios across Node.js, Java, and Python implementations.
In the second part of this blog, we’ll dive deeper into how to invoke this Heroku logic from Apex, Flow, and Agentforce, including the specific Salesforce security models in effect and practical implementation guidance for each integration point.
Pattern Comparison
Now that you’ve seen both primary patterns, here’s a comparison of their key differences:
| Aspect | Pattern 1: Salesforce API Access | Pattern 2: Extending Salesforce |
|---|---|---|
| Authentication | Run-as-user via salesforce:authorizations:add |
Invoking User via salesforce:connect |
| Buildpack | Not required – app accessible to external users | Required – blocks external access, Salesforce-only |
| Port Configuration | Standard PORT usage | APP_PORT configuration needed |
| Org Support | Multiple org connections supported | Single org connection with permission-based access |
| Service Discovery | Not required | Service publishing required (salesforce:publish) |
| Permission Model | Run-as-user permissions across orgs | User and user mode plus via Permission Sets |
| Use Case | Web apps accessing Salesforce data | Salesforce invoking external processing |
For detailed guidance on all integration patterns and when to use each one, note that we have a Getting Started Guide that goes through this in more detail, as well as being covered in context in each of the README files for our accompanying samples.
Additional integration patterns and features
While Patterns 1 and 2 cover the foundational approaches, AppLink also supports two additional patterns that extend these core concepts:
Pattern 3: Scaling batch jobs
This pattern builds on Pattern 2’s extension approach by delegating large-scale data processing with significant compute requirements to Heroku Worker processes. This pattern is ideal when you need to process large datasets that exceed Salesforce batch job limitations, providing parallel processing capabilities and sophisticated error handling. See the complete Pattern 3 implementation for detailed guidance on batch processing architectures.
Pattern 4: Real-time eventing
This pattern extends Pattern 1’s API access approach by using Run-as-User authentication to establish event listening for Platform Events and Change Data Capture from Salesforce. The work is performed by the Run-as-User, enabling real-time responses to data changes and event-driven automation with custom notifications sent to desktop or mobile devices. Explore the Pattern 4 implementation for event-driven integration examples.
To summarize, Pattern 3 builds on Pattern 2’s extension approach (Invoking User), while Pattern 4 builds on Pattern 1’s API access approach (Run-as-User), focusing on different scenarios and authentication models. Complete sample implementations for all four patterns are available in the AppLink integration patterns repository.
Data Cloud integration
AppLink provides comprehensive Data Cloud integration capabilities that enable bi-recreational data flow between your Heroku applications and Salesforce Data Cloud. Your applications can execute SQL queries against Data Cloud using the dataCloudApi.query() method to access unified customer profiles, journey analytics, and real-time insights.
Additionally, you can create Data Cloud Actions that allow Data Cloud to invoke your Heroku applications through Data Action Targets. The SDK’s parseDataActionEvent() function handles incoming Data Cloud events, providing structured access to event metadata, current and previous values, and custom business logic integration points. This creates powerful scenarios like real-time personalization engines, automated customer journey optimization, and intelligent data enrichment workflows that combine Data Cloud’s analytics capabilities with Heroku’s computational flexibility.
What’s next?
In our next blog in the AppLink Fundamentals series, we’ll delve into advanced integrations with Flow, Apex, and Agentforce, demonstrating how AppLink amplifies Salesforce’s existing features. Following that, we’ll cover the practical aspects of the development flow, including local testing, managing OpenAPI changes, and the key considerations when choosing between Apex and other programming languages for your Salesforce extensions.
Read More of the AppLink Fundamentals series
- AppLink Fundamentals I: AppLink Integration Patterns – Connecting Salesforce to Heroku Applications
- AppLink Fundamentals II: Advanced AppLink Integrations – Automation & AI
- AppLink Fundamentals III: Building with AppLink – Development Flow and Language Choices