

Why you need a staging environment
Moving fast should not mean breaking things for your users. While testing on localhost is a good start, you need a near identical replica of production to catch any bugs before your code goes live. That is where a staging environment comes in. Heroku pipelines handle the infrastructure layout for you, keeping your deployment workflow clean and automated.
Step 1: Create your pipeline and staging app
Most developers start with a single Heroku app connected to GitHub, where pushing to your main branch deploys straight to production. Moving to a continuous delivery (CD) workflow means breaking this direct path. Grouping your environments into a pipeline lets you intercept those automated updates, allowing you to test code within an isolated boundary before it ever impacts your users.
Every git push builds on staging first under this setup, leaving production untouched. This release process catches environment issues before they impact production. Google Cloud’s DORA research identifies deployment automation and staging environments as core technical capabilities that significantly reduce change failure rates.
What is change failure rate (CFR)?
Change Failure Rate (CFR) is the percentage of software deployments to production that result in a failure, requiring a rollback, hotfix, or emergency patch.
Set up your pipeline in the Heroku Dashboard
Before creating your pipeline, open your existing production app in the Heroku Dashboard, navigate to the Deploy tab, and turn off automatic deployment. This will prevent any operational conflicts after your pipeline has been set up. Once disabled, setup your pipeline in the UI by following these steps:
-

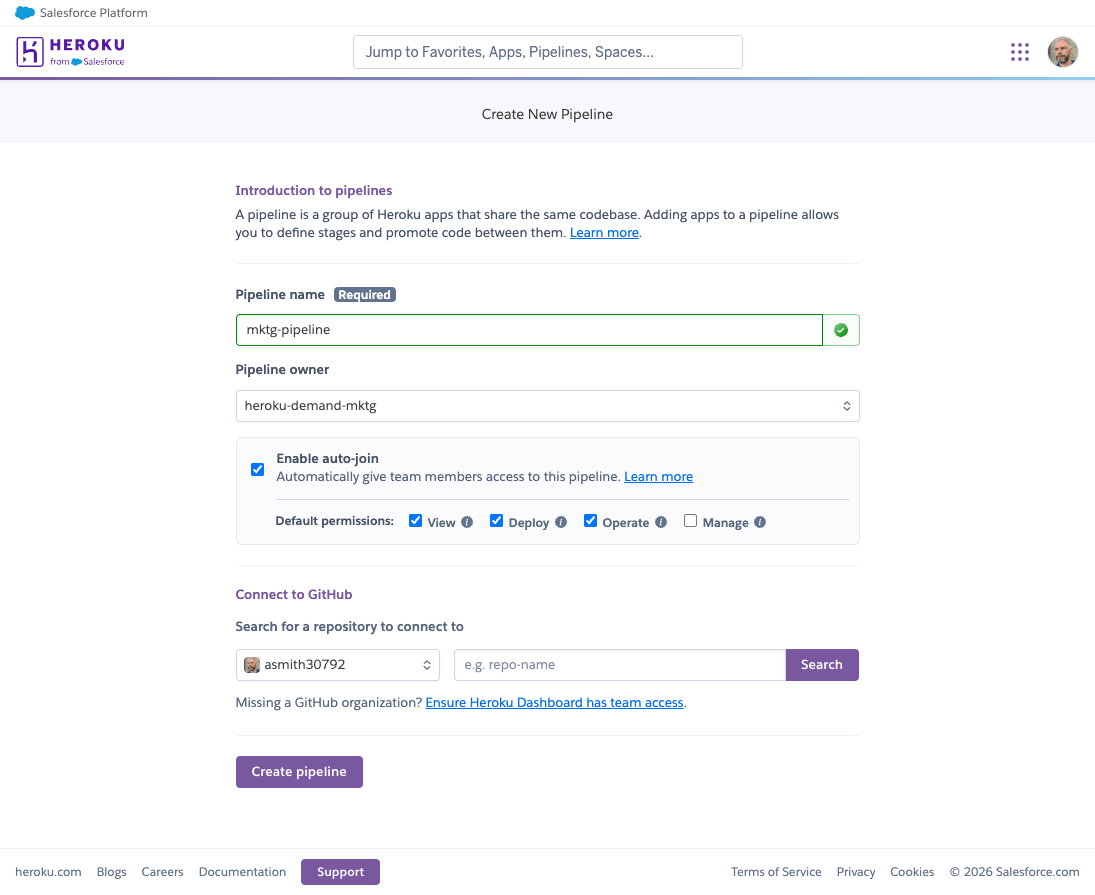
Create a pipeline
Select New at the top right of the Heroku Dashboard, click Create new pipeline, give it a unique name, and link your GitHub repository.
-
Link your production app
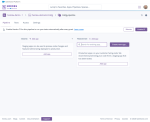
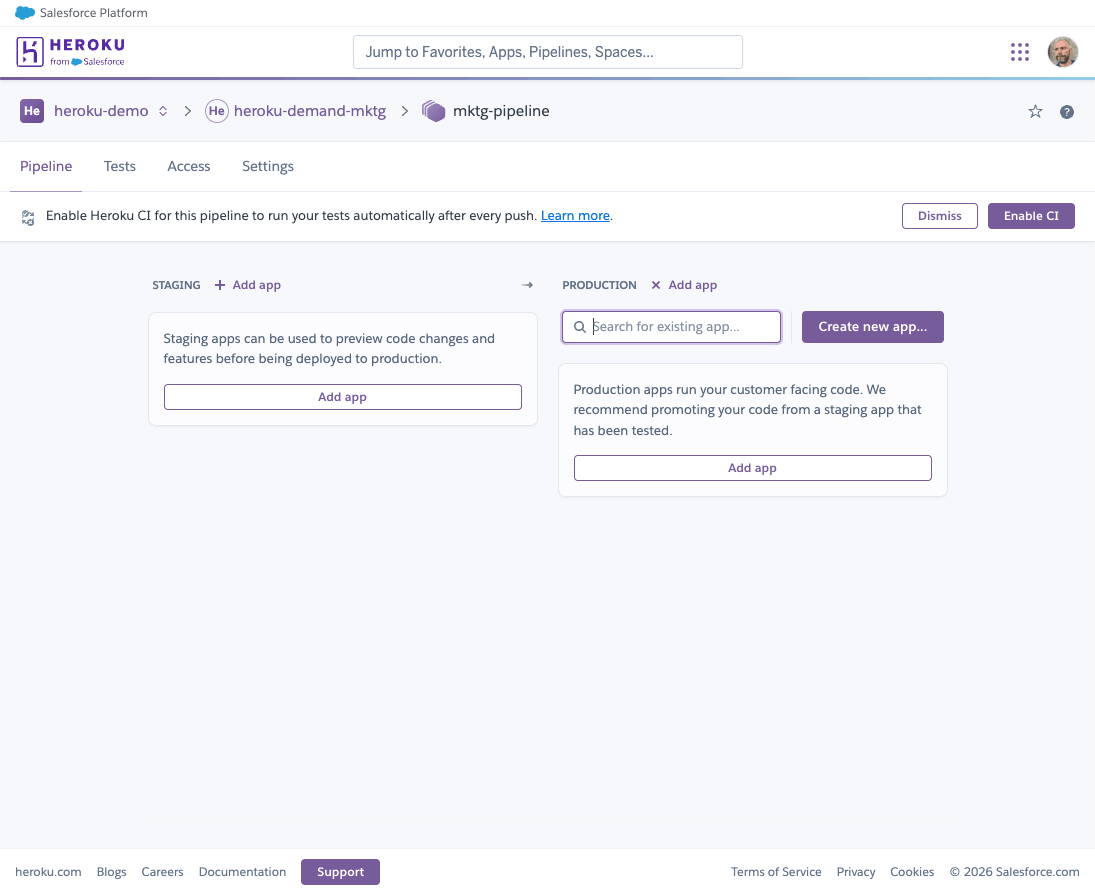
Click Add app inside the empty production column, search for your existing production app, and attach it to the pipeline.
-

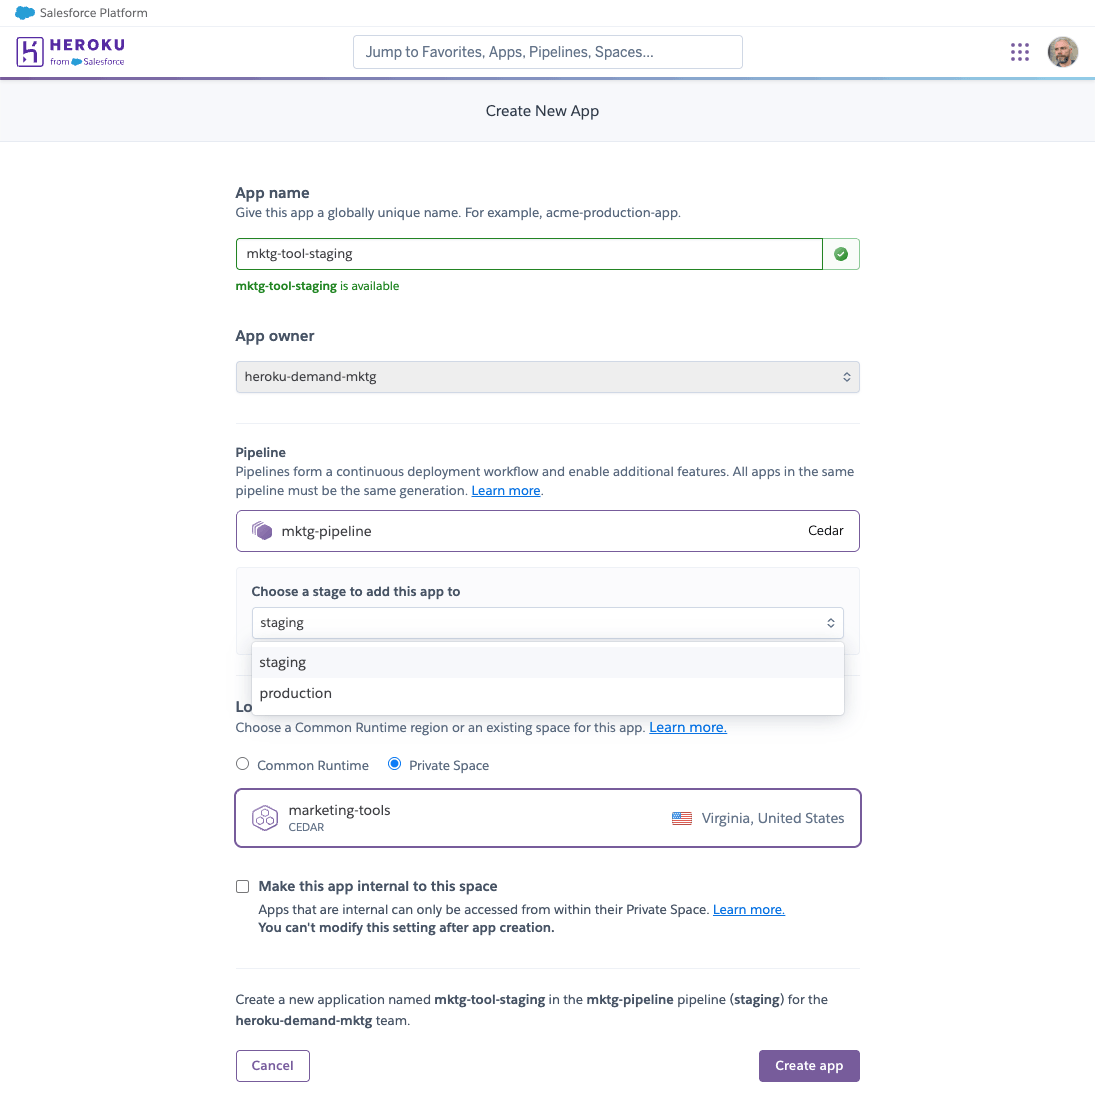
Add a new staging app
Click Add app inside the empty staging column, select Create new app… to create and attach your new staging app.
-

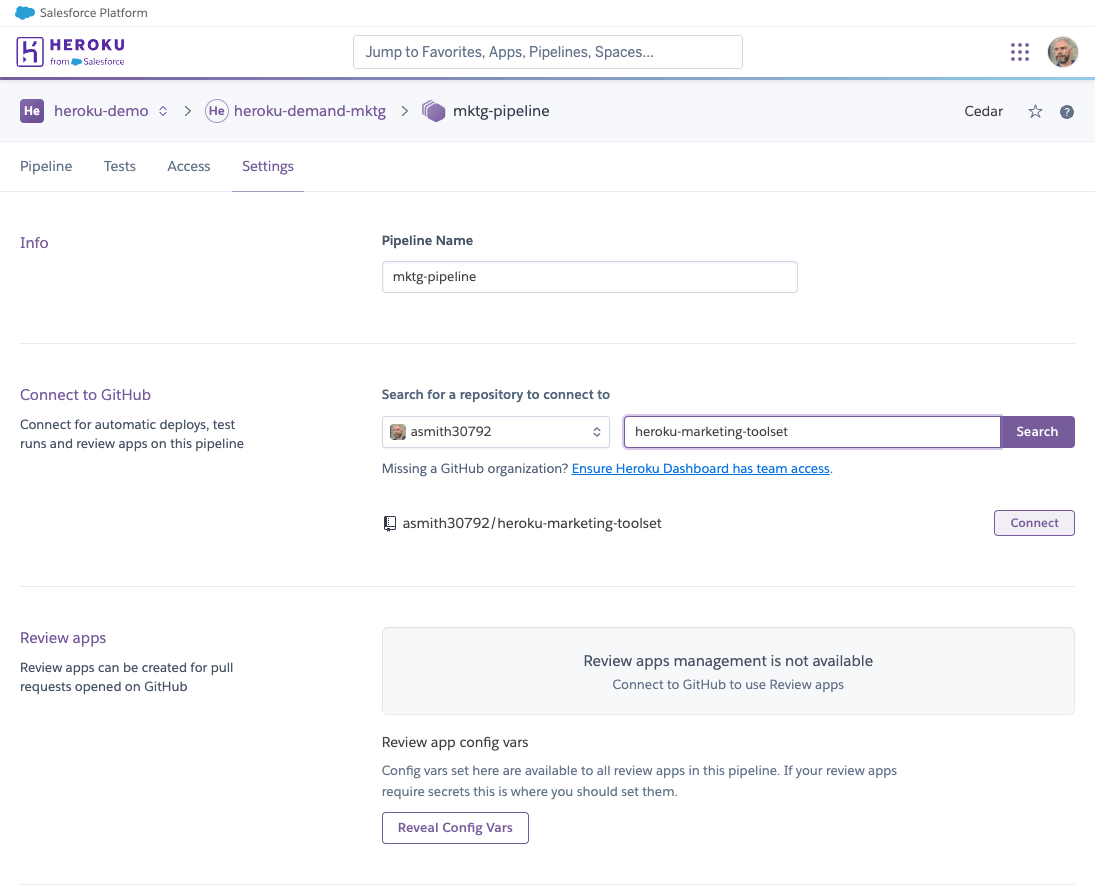
Connect to GitHub
In the pipeline settings, Search for your app’s GitHub repository and connect to it.
-

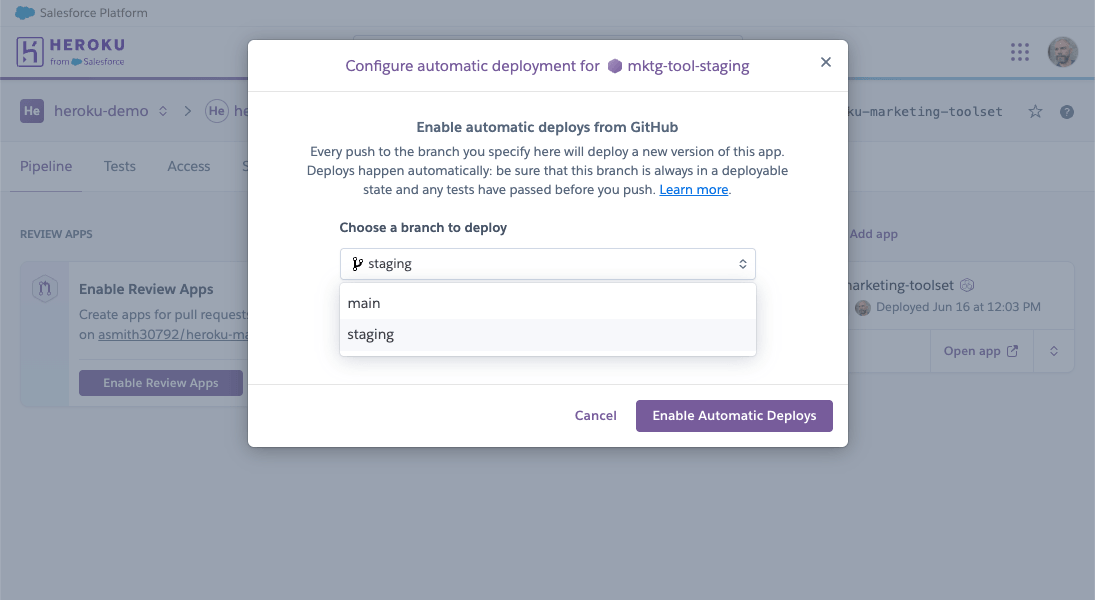
Automate staging builds
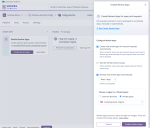
Click the down arrow on your staging app card, select Configure automatic deploys, verify your target branch, and click Enable Automatic Deploys.
-
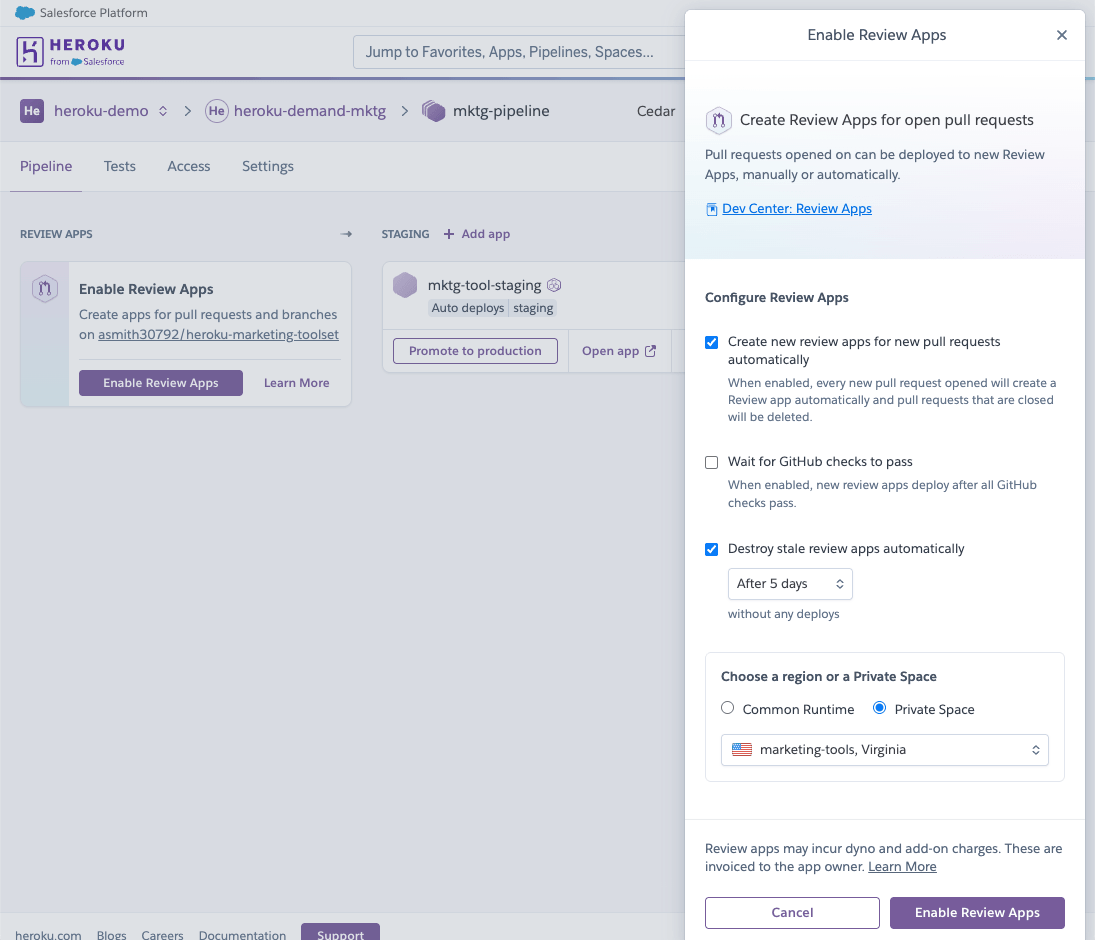
Enable Review Apps (Optional)
Review Apps automatically create temporary environments for each pull request, giving your team isolated testing environments before merging to main. If your team uses pull requests (PRs), click the Enable Review Apps button to automatically spin up temporary environments for every open PR.
Step 2: Follow Twelve-Factor principles to isolate your environment
Separating your configuration and backing services from your source code keeps your application portable and secure. This means isolating both your runtime configuration variables and your database infrastructure across pipeline stages.
Store config in the environment with config vars
Factor III of the Twelve-Factor app methodology says that you must store your configuration in the environment, never hardcoded in your repository. Heroku config vars make this simple by letting you manage environment variables independently for each stage of your pipeline.
Isolated variables keep your production credentials secure. You can update these variables via the settings tab in the Heroku Dashboard or using the CLI:
heroku config:set API_KEY=your_sandbox_value -a example-app-staging
Treat your database as an attached resource
Factor IV of the Twelve-Factor app methodology states that you should treat backing services, like databases, as attached resources. Your staging app must never read from or write to your production database. It requires its own isolated data layer. Depending on your compliance needs and testing goals, you can configure your staging data layer using one of two methods.
1. Build the schema from migrations (Review Apps required)
The recommended default approach is to provision a Heroku Postgres add-on for staging and build your schema from your repository migrations on every deploy. This pattern ensures your testing environment remains completely free of sensitive production data.
A fresh, empty database can be provisioned automatically each build when using Review Apps, configured through the environments.review key in app.json.
You can automate the migration step by using the release phase to run your database scripts immediately after a build succeeds but before the release is deployed. To configure this, define a release task that runs your migrations inside the Procfile at the root of your repository:
release: ./release-tasks.sh
If you have a script to seed your new, empty database with data for testing you can use the postdeploy script in app.json to run it. Here is an example app.json that provisions an Essential 0 database plan and specifies a postdeploy script for your Review Apps:
{
  "name": "Example App",
  "environments": {
    "review": {
      "addons": ["heroku-postgresql:essential-0"],
      "scripts": {
        "postdeploy": "./postdeploy.sh"
      }
    }
  }
}
2. Copy production data for realistic testing
If troubleshooting complex data anomalies or performance regressions requires a near identical replica of your live environment, you can copy your production data directly into your staging database.
The heroku pg:copy command is destructive. Running it will drop all tables and overwrite all data inside your target staging database. Because of this, the Heroku CLI requires you to manually type out the name of your staging app to confirm the overwrite.
If your data is safe to replicate, execute the copy command and complete the interactive prompt to confirm:
heroku pg:copy example-app-prod::DATABASE_URL DATABASE_URL -a example-app-staging
Step 3: Promote code to production with one click
When your staging build passes your validation checks, you can promote the app to move that exact code asset directly to production.
This process relies on slug promotion. Instead of compiling your source code a second time, Heroku copies the exact slug compiled during the staging build. This completely eliminates build environment discrepancies and guarantees that the verified code is what runs in production.
Promote via the Heroku Dashboard
If you prefer a visual workflow, you can handle promotions directly inside the Heroku Dashboard UI. Open your pipeline view, locate your staging app card, and click Promote to Production. Review and confirm the promotion to instantly push your changes live.
Promote via the Heroku CLI
If you prefer working in the terminal, you can trigger a pipeline promotion with a single command. Run the promotion command against your staging app to deploy the compiled slug to production:
heroku pipelines:promote -a example-app-staging --to example-app
Next steps for your deployment workflow
Configuring a staging environment and pipeline protects your live apps from unexpected regressions, configuration mismatches, and deployment conflicts. It forces you to build safe deployment habits early, ensuring you can ship updates with confidence.
This workflow also demonstrates Factor V of the Twelve-Factor app methodology: strict separation between build, release, and run stages. Heroku compiles your code once into an immutable slug (build stage), combines that slug with environment-specific config vars to create distinct releases (release stage), which are executed on dynos (run stage). The same compiled code runs in both environments. Only the configuration differs.
Because Heroku promotions copy immutable slugs instead of re-compiling code, rolling back is straightforward if it is ever needed. Each promotion or config change creates a new numbered release. If an unforeseen error slips past your staging tests, you can return your live application to a previous known good state in seconds.
Note: Rolling back to a previous release does not rollback actual data in your database, schema changes, or other database migrations. You will need to roll those back separately.
Pipeline validation checklist
Before you ship your next feature, verify your new pipeline meets these foundational criteria:
- Config separation: Your staging config vars use separate API keys and sandbox accounts rather than production credentials.
- Data isolation: Your staging application connects to a distinct backing database instance.
- Deployment isolation: Automatic deployments from GitHub are disabled for your production stage and enabled for your staging environment.
Use the Heroku Dashboard or the heroku pipelines CLI command to verify your setup and manage your stages. Building a reliable release process takes only a few minutes, but the peace of mind it provides when you ship code is permanent.
